ON THIS PAGE
You can convert a PNG to PDF in seconds with a free browser-based tool, without installing software or creating an account. For the clearest results, use 300 DPI for print and about 72–96 DPI for screen PDFs.
You're probably here because a screenshot, receipt, scan, or diagram needs to become a PDF before you can email it, upload it, or print it. The conversion itself is simple. The part that causes trouble is choosing the right page size, handling transparency, and avoiding a file that is either blurry or unnecessarily large.
PNG and PDF are both long-established, widely supported formats. PNG became a formal web standard on October 1, 1996, while PDF first appeared on June 15, 1993 and later became an international standard through ISO 32000-1 and ISO 32000-2. That history helps explain why modern browsers and operating systems handle PNG-to-PDF conversion so reliably. Convertio's PNG-to-PDF format overview provides further background on how the two formats fit together.
Table of Contents
- Quick Steps to Convert Your Images
- Combining Multiple Images Into One Document
- Understanding Page Size and Resolution
- Balancing File Size and Image Quality
- Fixing Common Conversion Issues
- Finalizing Your PDF and Next Steps
- Frequently Asked Questions
Quick Steps to Convert Your Images
If you need a PDF immediately, use a browser-based image-to-PDF tool instead of installing desktop software. The workflow is the same whether you're on Windows, macOS, Linux, or a mobile browser.
Follow the browser workflow
Open the image-to-PDF converter. Use a browser-based JPG to PDF tool that accepts PNG files as input. You won't need to install an app or create an account.
Add your PNG file. Drag the file into the upload area, or use the file picker on your phone or computer. A screenshot, receipt, chart, logo, or scanned page can all be used as the source.
Check the page preview. Look at the image orientation and margins before converting. A receipt in portrait orientation placed on a horizontally oriented page may leave large empty areas, while a wide screenshot may be reduced too far if the page is set vertically.
Arrange files if you added more than one. Drag the thumbnails into the order you want. The order becomes the page order in the finished PDF.
Convert and download. Start the conversion, then save the resulting PDF to your device. The output should contain one image per page unless you selected multiple images for a combined document.
This approach works well for a quick submission, a document attachment, or a file that must be viewed consistently across devices. Every PDFKing tool is 100% free, has no watermark, and requires nothing to install. The browser-based workflow is also useful when you're using a work computer or phone where you can't install software.
Before sending the file, open the PDF and inspect it at normal size. Check that text inside the image is readable, the whole image is visible, and the page isn't rotated unexpectedly. If the result looks wrong, fix the source image or page settings before trying heavier compression.
Combining Multiple Images Into One Document
A group of PNG files usually needs more care than a single image. You might have scanned pages, exported presentation slides, receipts, or screenshots that belong in one ordered document. Converting each file separately creates unnecessary cleanup, so add them together before you export.
Build the page sequence first
Select all the images in the browser tool, then review the thumbnail order. Use filenames that sort logically when possible, such as page-01.png, page-02.png, and page-03.png. If the tool displays thumbnails, drag individual images until the sequence matches the original document.
The order matters because each PNG normally becomes its own PDF page. A report with the cover at the end is technically valid, but it isn't ready to share. Check for duplicate files, missing pages, and sideways scans before you convert.
Practical rule: Treat the thumbnail strip as a table of contents. If the sequence is wrong there, the PDF sequence will be wrong too.
Keep each image as its own page
A multi-image conversion should preserve the images as separate pages inside one PDF. That makes the document easier to print, scroll, archive, and submit than a folder of individual files. It also avoids manually merging separate PDFs after the conversion.
If you already created separate PDFs, use the merge PDF tool to combine them into a single ordered file. For mixed image types, check that every source file has the correct orientation and dimensions before adding it. PNG, JPG, and WebP files can often be handled in the same image-to-PDF workflow, but they may have different compression and color characteristics.
For mobile work, upload the files from your device's photo library or file manager, then download the completed PDF. Large image batches can take longer on a phone because the browser has less available memory, so converting a smaller group at a time may be more reliable.
Understanding Page Size and Resolution
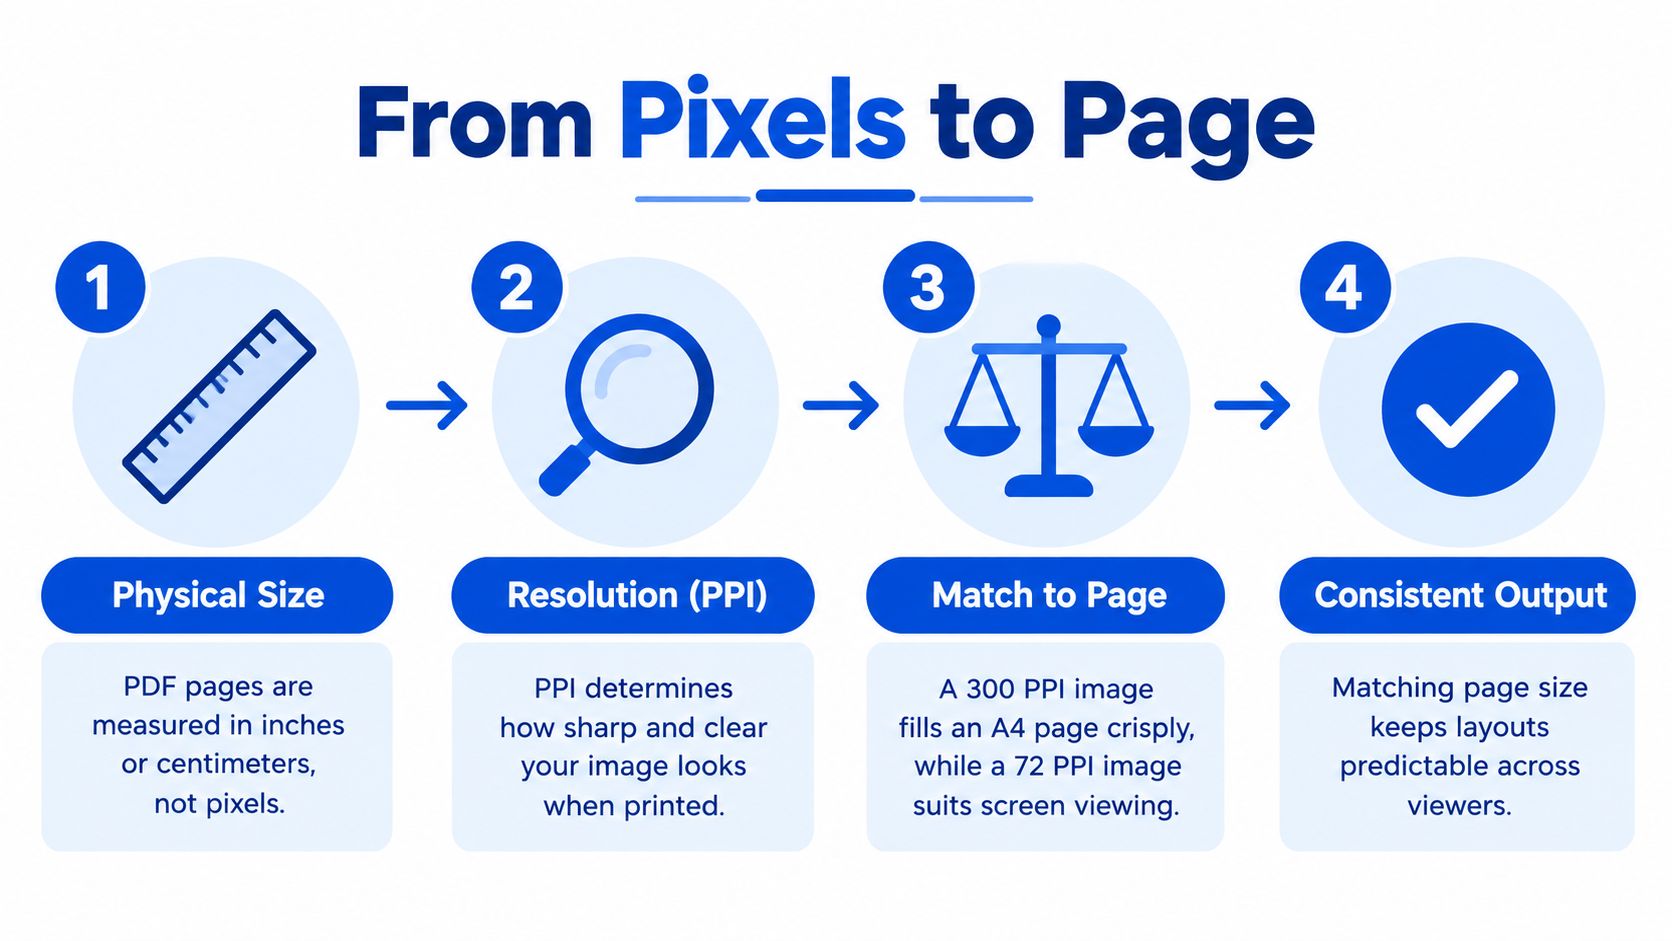
A PDF page doesn't have a PPI setting in the same way an image does. It has a physical size, such as a page measured in inches or centimeters. Converting PNG to PDF means mapping the image's pixels onto that physical page.
The basic relationship is:
Page width in points = pixel width ÷ DPI × 72
For example, an image that is 2472 × 4119 pixels at 300 DPI produces a page of about 8.24 × 13.73 inches, according to Adobe community guidance on controlling PPI in PDF pages. The same pixel dimensions mapped at a different resolution would produce a different physical page size.
Choose resolution based on the destination
Use 300 DPI when the PDF is intended for print. That gives text, line art, and fine details enough pixel density for a sharp physical output, assuming the source PNG contains enough pixels.
For screen viewing, email, or online review, about 72–96 DPI is often sufficient. A lower setting can produce a smaller file, but it may make small text difficult to read if the recipient zooms in or prints the document.
A practical way to think about it is:
- Print output: Map the PNG to its intended physical size at 300 DPI.
- Screen output: Use a lower resolution when the document only needs to be read on a display.
- Mixed use: Favor the higher resolution if the same PDF may be printed later.
Page matching matters just as much as DPI. If a narrow receipt is forced onto a standard page without sensible scaling, you may get large margins. If a small screenshot is enlarged to fill the page, text can become soft. Before exporting, decide whether you want the image to fit the page, fill the page, or retain its original physical dimensions. When a finished file is too large, use the PDF file size reduction guide rather than shrinking the source blindly.
Balancing File Size and Image Quality
A PDF can look correct and still be far larger than it needs to be. PNG compression preserves the source pixels, which works well for screenshots, diagrams, interface captures, and images containing sharp text. The trade-off appears when each PNG is embedded without recompression, because the PDF may retain nearly all of the original image data.
A batch of 50 PNG files at 2 MB each can produce a PDF near 100 MB when the images are not recompressed, as described in this comparison of PNG-to-PDF conversion methods. Large files are slower to upload, harder to email, and less convenient to open on a phone.
Keep quality for text and diagrams
Lossless embedding is usually the safer setting for images containing:
- Small text, where compression artifacts can alter letter shapes.
- Line drawings, where clean edges must remain sharp.
- Charts and diagrams, where thin lines and labels need to stay distinct.
- Screenshots, where high-contrast interface edges reveal blur quickly.
The PDF will be larger, but its pages will stay closer to the source PNG. That matters when the document is archived, printed, or used as evidence of an original screen or document. Keep the source dimensions appropriate for the page size too. An oversized image mapped to a small physical page wastes storage, while an undersized image enlarged during conversion loses clarity.
Compress photographic images selectively
If the PNG is mainly photographic, re-encoding its image content as JPEG inside the PDF can reduce file size by roughly 3–10x. The greatest savings usually come from photographs, while text, line art, and sharp borders show compression defects more readily.
Apply settings according to the image, not the document alone. A compressed photo may remain acceptable in a report, whereas a compressed screenshot can develop halos around letters or fuzzy control borders. Transparent PNGs also deserve attention. If the conversion process flattens transparency against a page background, the resulting file may contain a large raster surface even when the visible graphic is simple.
For a smaller document, duplicate the source files first, compress the copies, and compare both PDFs at the viewing or printing size your recipient will use. The PDF compression tool can reduce the file after conversion when page layout and image placement are already correct. Treat it as a final size adjustment, not a replacement for choosing suitable image dimensions or preserving quality where it matters.
Fixing Common Conversion Issues
A PNG-to-PDF conversion can be technically successful and still look wrong. The most common example is a transparent logo or graphic that appears on a white page. Transparent PNG areas often turn white in PDF output, and the final result can also change with page size, orientation, margins, and compression settings. WPS's guide to PNG-to-PDF conversion describes why the transformation isn't always visually neutral.
When transparency becomes white
PDF viewers commonly display a solid page background. If the original PNG uses transparency around a logo, icon, or illustration, the transparent area may appear white after conversion. That isn't necessarily a conversion error. It may be the expected result of placing the raster image on a document page.
If the background matters, add the intended solid color to a copy of the PNG before converting. A white background is suitable for many forms and business documents. A darker or branded background may be better for a presentation graphic, but check that text remains readable.
When the result looks blurry
Blurry output usually comes from enlarging a small image, resizing it during export, or applying too much compression. Start with the highest-resolution source available, then choose a page size that doesn't stretch it beyond what its pixels can support.
Check these points in order:
- Source dimensions: A small PNG can't become a sharp full-page print just because it was placed in a PDF.
- Page scaling: Avoid enlarging the image more than necessary.
- Compression: Recheck files that contain text or line art after reducing their size.
- Orientation: Match portrait images with portrait pages and wide-format images with wide-format pages.
If the PDF opens slowly, oversized images or inefficient page ordering may be contributing factors. Use the guide to oversized PDF files to identify the cause, then compress only after confirming that the pages still look correct.
Finalizing Your PDF and Next Steps
The conversion is finished when the file downloads, but a quick review prevents avoidable mistakes. Open the PDF in a browser and inspect every page at normal viewing size. Don't rely only on the thumbnail preview, because small text and missing edges can be hard to spot there.
Use this final check:
- Confirm the page count. Make sure every source image appears.
- Check the sequence. Verify that pages, receipts, or slides are in the intended order.
- Review orientation. Look for pages that were rotated automatically.
- Inspect transparency. Confirm that white or colored backgrounds are acceptable.
- Check readability. Zoom into small text, charts, and line art.
- Review the file size. Compress the PDF only if the final document is larger than your destination allows.
You can add organization after conversion if the document needs it. For example, use an add page numbers tool for a long report, or reorder and remove pages when a scan includes unwanted material. Keep an uncompressed original when image fidelity matters, then create a smaller sharing copy when necessary.
A browser-based workflow is enough for most everyday jobs. You don't need a watermark, installation, or account to turn images into a shareable PDF, and the same type of toolkit can handle merging, compression, page organization, and other routine document tasks.
Frequently Asked Questions
Can I convert a PNG to PDF without installing software?
Yes. A browser-based converter can process the PNG and return a PDF without desktop software, an extension, or an account. The workflow works on computers and mobile devices, although very large files may take longer on phones.
Will a transparent PNG stay transparent in the PDF?
Not always. Transparent areas often appear white after conversion because the PDF page displays the raster image against a solid background. If the background is important, place the PNG on the intended background color before exporting.
What DPI should I use for a PNG-to-PDF conversion?
Use 300 DPI for print-quality output and about 72–96 DPI for screen-focused PDFs. The best setting also depends on the image's pixel dimensions and the physical page size you want.
Why is my converted PDF so large?
Lossless PNG embedding preserves image detail but can create a PDF that is close to the combined size of the source images. This is common with high-resolution files and multi-page image documents. Compress a copy of the finished PDF when file size matters more than exact pixel preservation.
Can I combine PNG and JPG files in one PDF?
Yes. Add the supported image files to the same conversion workflow, arrange them in the required order, and export them as one multi-page PDF. Review the pages afterward because different source formats may have different dimensions and orientations.
Does converting a PNG make the text searchable?
No. Text inside a PNG remains part of the image. The PDF can display that text, but selecting or searching it requires optical character recognition, which is a separate process from image-to-PDF conversion.
PDFKing provides free browser-based tools for converting images to PDF, combining files, compressing documents, and organizing pages, with no watermark and nothing to install. Convert your PNG now with the PDFKing toolkit, then review the page size, image quality, and final file size before you share it.